Barry Shand (Shandy)
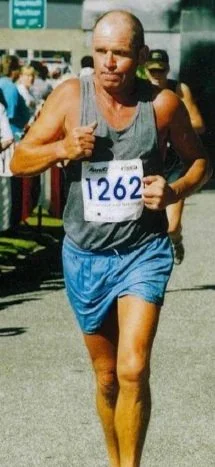
04/03/1947 ~ 12/06/2026
Funeral Date: Thursday 18th June 2026 at 1:00 PM
Funeral Location: 123 Derby St, Westport, New Zealand
All Welcome
[Any text]
Tribute Post Instructions [Delete]
Duplicate Template: If not already done so, click Save and then Exit in the top left and create a duplicate of this template ( three dots … > Duplicate).
Add the Cover Image: Click the three dots next to the duplicate ‘Template [Name](Copy)’, click Settings to open the Settings Menu. In the Content Tab, click Remove Image > Add Image > find the correct image from your files. Once the image has loaded, if it is not a square image, click on the image to move the small circle to the location you want centered in the square image icon - likely the middle of the face.
Add the Excerpt (Dates): In the Excerpt box, type the birth/death date range.
Edit the Post: Click on ‘Template [Name](Copy)’ and click Edit at the top left of the page. Make sure it is ‘Template [Name](Copy)’, not ‘Template [Name]’ - we will keep ‘Template [Name]’ as the empty template. Fill out Name, Birth/Death Dates, Funeral Date & Time, and add any extra text required, delete [Any text] if not required.
Add the Post Image: Click on the image box, click upload file, find it in your files and click open. Once it loads, if it is off center, click it again and select the Pencil Icon (Edit). Move the small circle on the image to where you want centered.
Attach the Video URL to the Button: Click on the Watch Livestream button, then click Edit Link (chainlink icon). Here paste the video URL.
Attach the Service Sheet to the Button: Click on the Service Sheet button, then click Edit Link (chainlink icon). In the dropdown, select File instead of URL, click the upload arrow, find the service sheet file from your files, click open.
Attach the Tribute Slideshow to the Button: Click on the View Tribute Slideshow button, then click Edit Link (chainlink icon). In the dropdown, select File instead of URL, click the upload arrow, find the Tribute Slideshow file from your files, click open.
Deleting a Button if not needed: If any of the three buttons are not applicable for this particular person i.e., no Tribute Slideshow, you can remove the button by clicking on it and clicking the trashcan.
Adding Extra Buttons or Images: If you have anything extra to add i.e., a picture, funny video, spotify playlist link, click to the side of this textbox, hover over whichever block of text or button you want it to sit under, and click the blue ‘+’ that pops up. Select either Button or Image. For a button, in the Content Tab, change Learn More to say the the link will be. Click Attach Link and add the URL link or File link the same way as (6) or (7). Go to the Design Tab, change it to Secondary Button, and select Fill.
Delete Instructions: Delete these instructions so they don’t show once you post it.
Saving the Post: If you need to leave this post before you’re ready to publish, click Save, then Exit in the top left corner.
Publishing Immediately: When you have completed the post, click Save in the top left corner. Then click Publish > Publish in the top left corner, which will post it.
Scheduling a Publish Date/Time: When you have completed the post, but want to publish at a later time/date, click Publish > Schedule in the top left corner. Select a date/time you want the post to be published. Click Schedule in the top right of the pop-up to save. Click Save, and then Exit in the top left.
Note: Once the post is published, you can edit it by clicking Edit. Don’t forget to click Save and Exit when you are done editing.